> ## Documentation Index
> Fetch the complete documentation index at: https://docs.mossx.ai/llms.txt
> Use this file to discover all available pages before exploring further.
# Prepare your environment
> Set up a runtime, provider credentials, and each engine CLI for the CC GUI desktop app.
After you install the app, you still need at least one working AI runtime and a project workspace.
## 1. Understand the dependencies
The desktop app is a full application. You do not need VS Code or IDEA.
Chat still depends on a local runtime:
| If you want | You need |
| --------------------------- | --------------------------------------------------------------------------------- |
| Claude Code | Follow the guide to install the CLI and configure it |
| Codex | Follow the guide to install the CLI and configure it |
| Kimi / Grok / OpenCode / Pi | The matching command on this machine, plus local config or a third-party provider |
| DeepSeek Harness | Start DSH locally and finish its setup |
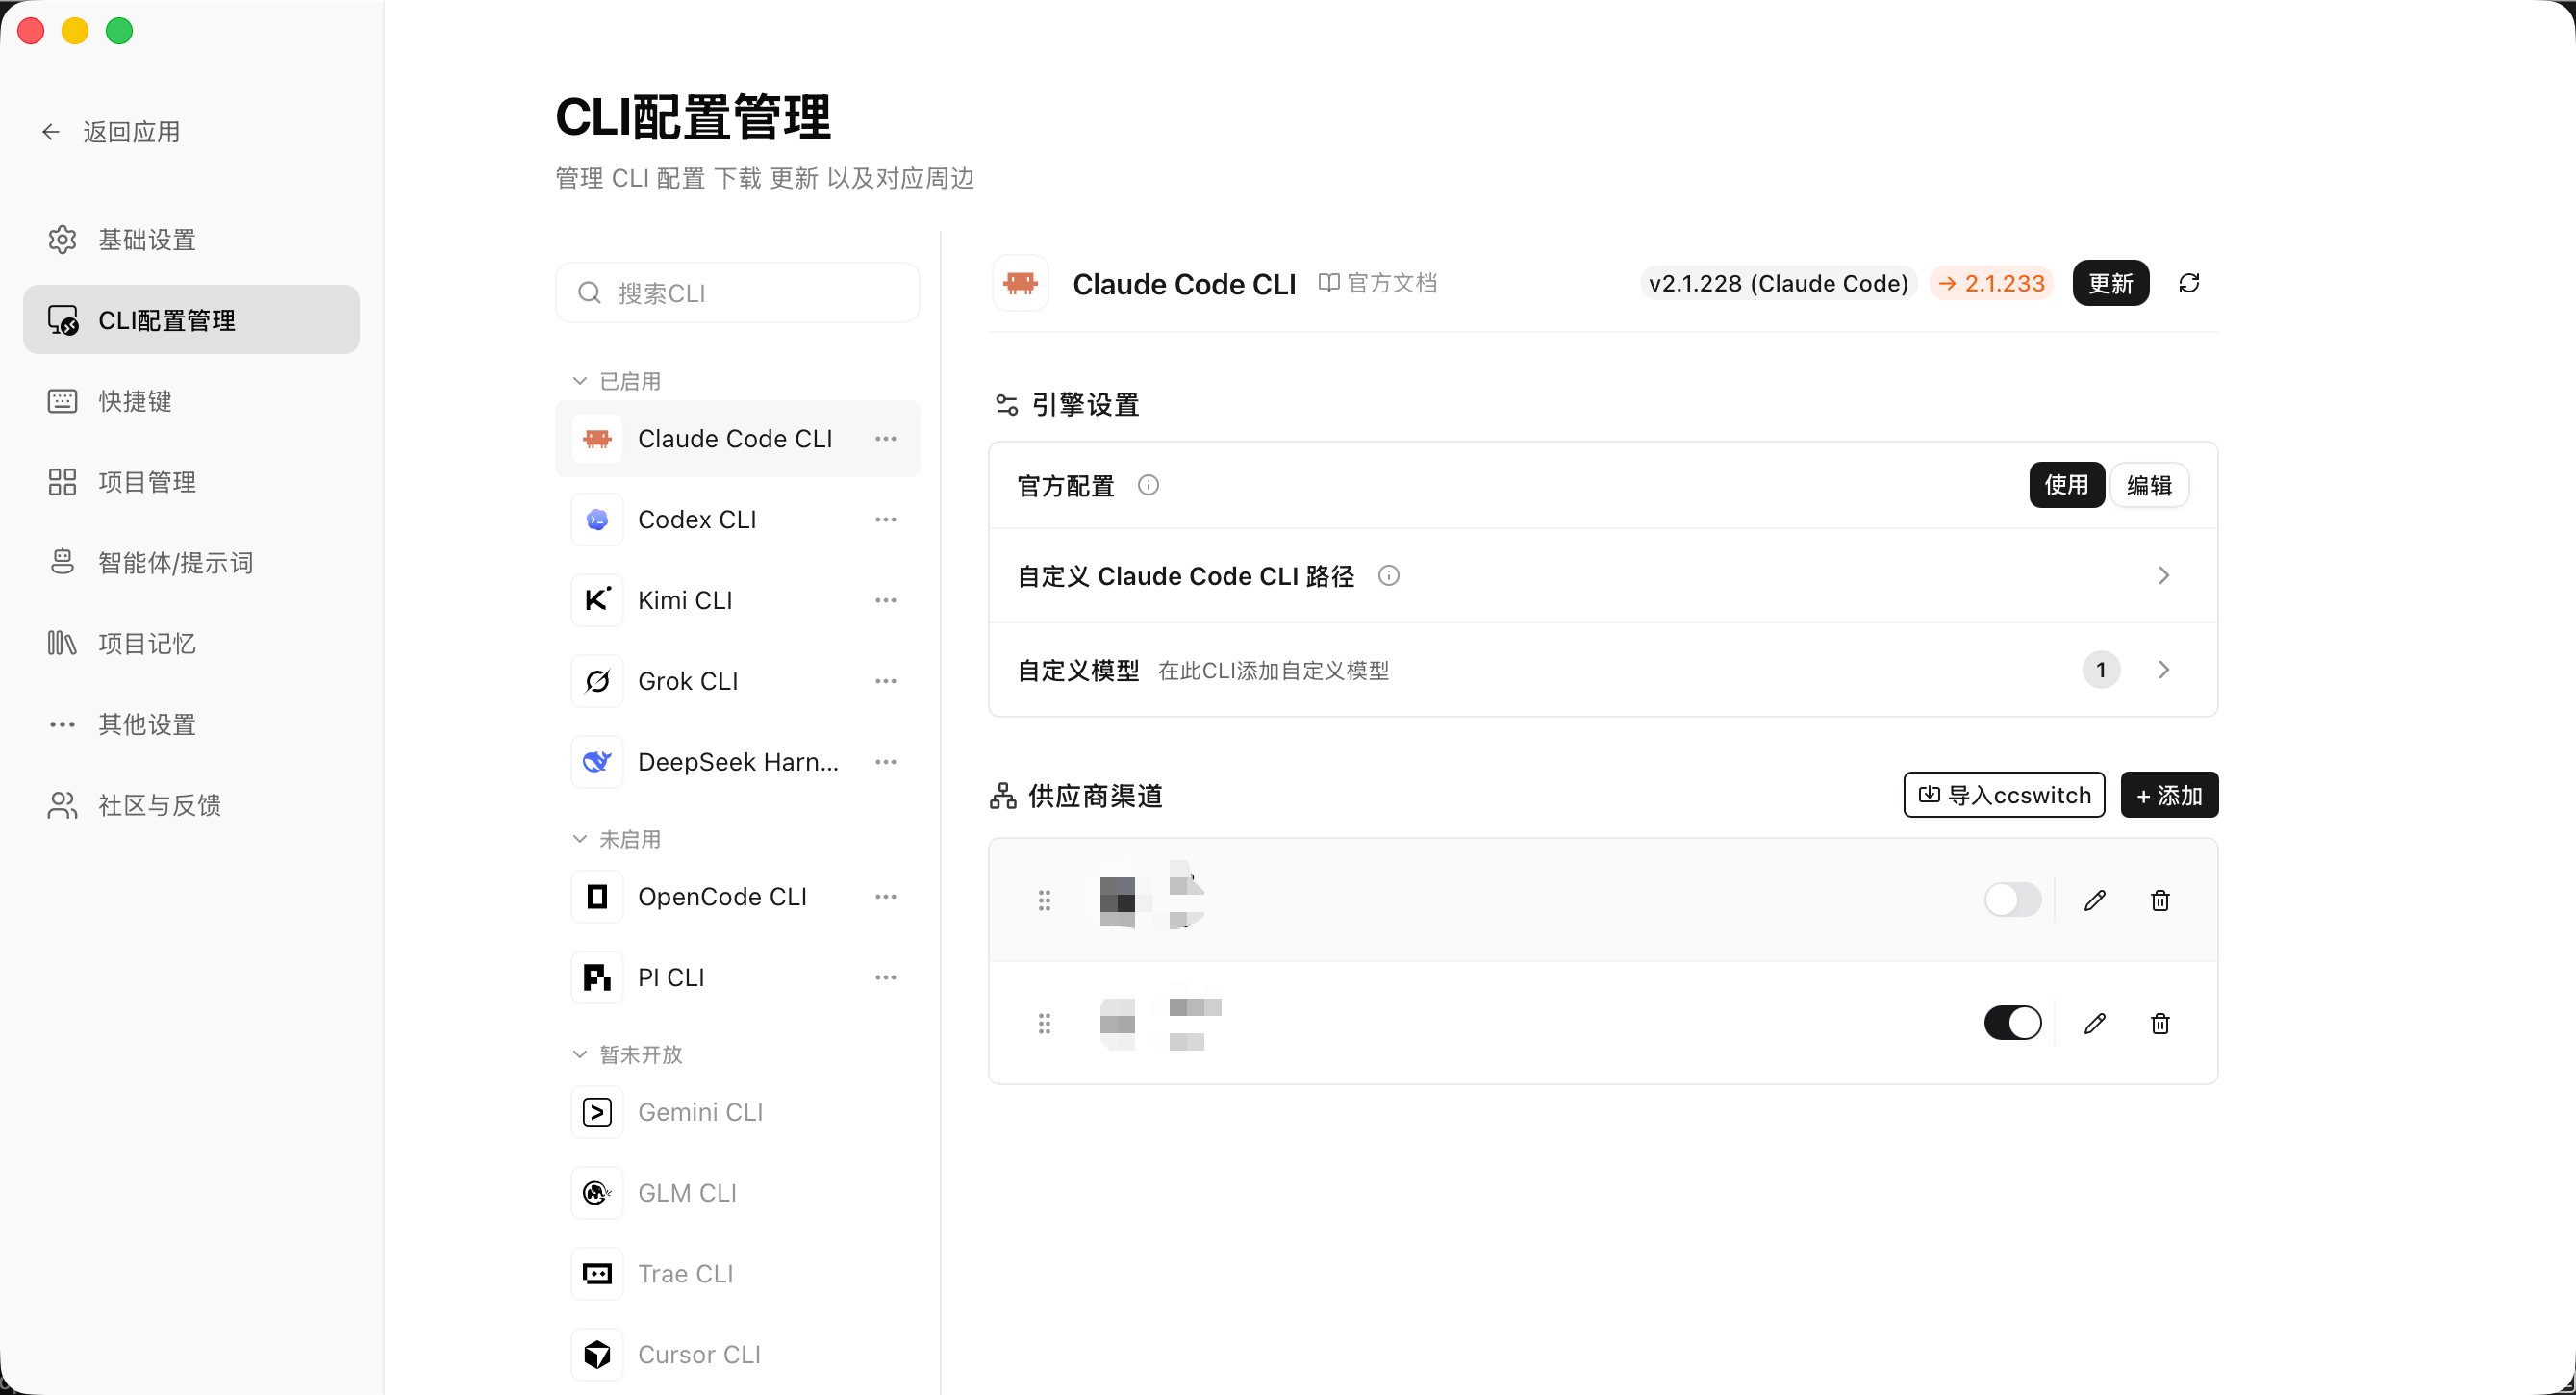
Open **Settings → CLI configuration** (providers) to see detect status and install notes. Available engines and **Coming soon** items appear in separate groups.
 ## 2. Configure CLI
Open **Settings → CLI configuration**. The left list is grouped as **Enabled / Disabled / Coming soon**. Open an engine to detect its version, install or update the CLI, and configure credentials.
Available engines and **Coming soon** entries both appear. If Gemini, Cursor, Copilot, Qwen, or similar sit under **Coming soon**, do not configure them as shipped runtimes.
* Add a hosted provider: name, API key, base URL, model mapping
* Or use local `~/.claude/settings.json` / CLI login
* Official direct traffic goes to Anthropic; third-party presets (Zhipu, Kimi, DeepSeek, OpenRouter, and others) route to their endpoints
* Hosted profiles live in `~/.ccgui/config.json`
* You can override the Claude CLI path
* If it is not installed, click **Install** on that page, or install from the terminal commands on the engine page
Details: [Claude Code](/en/desktop/providers/claude).
* Add a provider; config is written to `~/.codex/`
* Or use local `config.toml` / `auth.json`
* For a subscription account, run `codex login` in a terminal first
* You can add custom models and message / MCP environment variables
* You can override the Codex CLI path
* If it is not installed, click **Install** on that page, or install from the terminal commands on the engine page
Details: [Codex](/en/desktop/providers/codex).
* Use local `~/.kimi-code/config.toml` (override with `$KIMI_CODE_HOME`)
* Or add a third-party provider: name, base URL, API key, model. Enabling it writes that `config.toml` (backed up first as `config.toml.bak`)
* Provider types: Kimi Code official / OpenAI-compatible / Anthropic-compatible
* Quick presets: Kimi Code (official), Moonshot Open Platform
* You can override the Kimi CLI path
* If it is not installed, click **Install** on that page, or install from the terminal commands on the engine page
Details: [Kimi](/en/desktop/providers/kimi).
* Use local `~/.grok/config.toml` (override with `$GROK_HOME`)
* Or add a third-party provider: name, base URL, API key, model. Enabling it writes that `config.toml` (backed up first as `config.toml.bak`)
* API backends: Chat Completions / Responses / Messages (Anthropic)
* Quick preset: xAI (official)
* You can override the Grok CLI path
* If it is not installed, click **Install** on that page, or install from the terminal commands on the engine page
Details: [Grok](/en/desktop/providers/grok).
* Use local `~/.config/opencode/opencode.json` (`$OPENCODE_CONFIG` wins)
* Or add a third-party provider: name, base URL, API key, model list. Hosted providers use env injection and **do not** change `opencode.json`
* Quick preset: OpenCode Zen (official)
* You can override the OpenCode CLI path, or move this engine to **Disabled**
* If it is not installed, click **Install** on that page, or install from the terminal commands on the engine page
Details: [OpenCode](/en/desktop/providers/opencode).
* Auth lives in `~/.pi/agent/auth.json` (mode `0600`)
* You can enter API keys for Anthropic, OpenAI, Gemini, DeepSeek, xAI, OpenRouter, and others
* For subscription auth, click **Log in**: the app opens the built-in terminal, starts `pi`, then sends a command such as `/login anthropic`. You can also run `pi /login` in a system terminal. The app does not run OAuth for you; it only reads `auth.json`
* Resolve order: `--api-key` → `auth.json` → environment variables → `models.json`
* You can override the Pi CLI path
* If it is not installed, click **Install** on that page, or install from the terminal commands on the engine page
Details: [Pi](/en/desktop/providers/pi).
* The app connects to a local DSH host. It does not take another API key
* Set **Host** (default `127.0.0.1`) and **Port** (default `3080`)
* You can turn on **Auto-start host**
* Configure models and API keys in the DSH Web UI. Click **Open DSH settings**
* You can override the DSH binary path
* If it is not installed, click **Install** on that page, or install from the terminal commands on the engine page
Details: [DeepSeek Harness](/en/desktop/providers/dsh).
Full notes for each engine are in the sidebar **Providers / CLI** group. Detect and PATH troubleshooting: [Detect and install](/en/desktop/providers/cli).
API keys stay on this computer. Mask them before you screenshot or record.
## 3. Install CLI
The app **does not silently install** any CLI. In **CLI configuration**, click **Install** / **Update** (it shows a plan first, then runs after you confirm), or install in a system terminal and come back to Settings to detect again.
Install commands live on each engine page so this page does not copy them:
| Engine | Install notes |
| ---------------- | ------------------------------------------------------------------ |
| Claude Code | [Install](/en/desktop/providers/claude#install) |
| Codex | [Install](/en/desktop/providers/codex#install) |
| Kimi | [Install](/en/desktop/providers/kimi#install) |
| Grok | [Install](/en/desktop/providers/grok#install) (use WSL on Windows) |
| OpenCode | [Install](/en/desktop/providers/opencode#install) |
| Pi | [Install](/en/desktop/providers/pi#install) |
| DeepSeek Harness | [Install](/en/desktop/providers/dsh#install) |
Failed detects, PATH, and custom paths: [Detect and install](/en/desktop/providers/cli).
## 4. Config paths
| Path | Use |
| ----------------------------------- | ---------------------- |
| `~/.ccgui` | CCGUI config |
| `~/.claude/settings.json` | Claude Code CLI config |
| `~/.codex/config.toml`, `auth.json` | Codex CLI config |
| `~/.kimi-code/config.toml` | Kimi CLI config |
| `~/.grok/config.toml` | Grok CLI config |
| `~/.config/opencode/opencode.json` | OpenCode CLI config |
| `~/.pi/agent/auth.json` | Pi CLI config |
## 5. Add a project workspace
The app organizes sessions and files as a workspace / project:
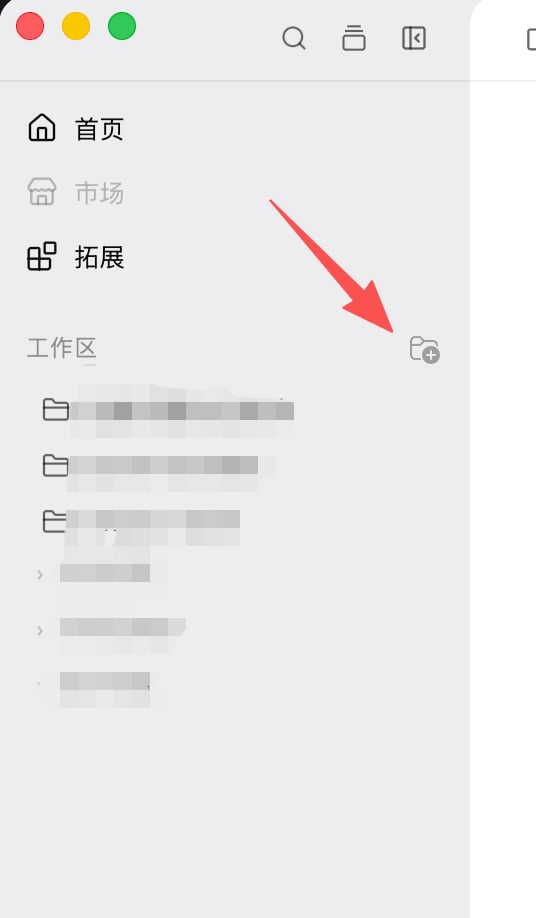
1. Open Home
2. Click **Add project**
3. Choose a local folder
4. Confirm to enter that workspace
## 2. Configure CLI
Open **Settings → CLI configuration**. The left list is grouped as **Enabled / Disabled / Coming soon**. Open an engine to detect its version, install or update the CLI, and configure credentials.
Available engines and **Coming soon** entries both appear. If Gemini, Cursor, Copilot, Qwen, or similar sit under **Coming soon**, do not configure them as shipped runtimes.
* Add a hosted provider: name, API key, base URL, model mapping
* Or use local `~/.claude/settings.json` / CLI login
* Official direct traffic goes to Anthropic; third-party presets (Zhipu, Kimi, DeepSeek, OpenRouter, and others) route to their endpoints
* Hosted profiles live in `~/.ccgui/config.json`
* You can override the Claude CLI path
* If it is not installed, click **Install** on that page, or install from the terminal commands on the engine page
Details: [Claude Code](/en/desktop/providers/claude).
* Add a provider; config is written to `~/.codex/`
* Or use local `config.toml` / `auth.json`
* For a subscription account, run `codex login` in a terminal first
* You can add custom models and message / MCP environment variables
* You can override the Codex CLI path
* If it is not installed, click **Install** on that page, or install from the terminal commands on the engine page
Details: [Codex](/en/desktop/providers/codex).
* Use local `~/.kimi-code/config.toml` (override with `$KIMI_CODE_HOME`)
* Or add a third-party provider: name, base URL, API key, model. Enabling it writes that `config.toml` (backed up first as `config.toml.bak`)
* Provider types: Kimi Code official / OpenAI-compatible / Anthropic-compatible
* Quick presets: Kimi Code (official), Moonshot Open Platform
* You can override the Kimi CLI path
* If it is not installed, click **Install** on that page, or install from the terminal commands on the engine page
Details: [Kimi](/en/desktop/providers/kimi).
* Use local `~/.grok/config.toml` (override with `$GROK_HOME`)
* Or add a third-party provider: name, base URL, API key, model. Enabling it writes that `config.toml` (backed up first as `config.toml.bak`)
* API backends: Chat Completions / Responses / Messages (Anthropic)
* Quick preset: xAI (official)
* You can override the Grok CLI path
* If it is not installed, click **Install** on that page, or install from the terminal commands on the engine page
Details: [Grok](/en/desktop/providers/grok).
* Use local `~/.config/opencode/opencode.json` (`$OPENCODE_CONFIG` wins)
* Or add a third-party provider: name, base URL, API key, model list. Hosted providers use env injection and **do not** change `opencode.json`
* Quick preset: OpenCode Zen (official)
* You can override the OpenCode CLI path, or move this engine to **Disabled**
* If it is not installed, click **Install** on that page, or install from the terminal commands on the engine page
Details: [OpenCode](/en/desktop/providers/opencode).
* Auth lives in `~/.pi/agent/auth.json` (mode `0600`)
* You can enter API keys for Anthropic, OpenAI, Gemini, DeepSeek, xAI, OpenRouter, and others
* For subscription auth, click **Log in**: the app opens the built-in terminal, starts `pi`, then sends a command such as `/login anthropic`. You can also run `pi /login` in a system terminal. The app does not run OAuth for you; it only reads `auth.json`
* Resolve order: `--api-key` → `auth.json` → environment variables → `models.json`
* You can override the Pi CLI path
* If it is not installed, click **Install** on that page, or install from the terminal commands on the engine page
Details: [Pi](/en/desktop/providers/pi).
* The app connects to a local DSH host. It does not take another API key
* Set **Host** (default `127.0.0.1`) and **Port** (default `3080`)
* You can turn on **Auto-start host**
* Configure models and API keys in the DSH Web UI. Click **Open DSH settings**
* You can override the DSH binary path
* If it is not installed, click **Install** on that page, or install from the terminal commands on the engine page
Details: [DeepSeek Harness](/en/desktop/providers/dsh).
Full notes for each engine are in the sidebar **Providers / CLI** group. Detect and PATH troubleshooting: [Detect and install](/en/desktop/providers/cli).
API keys stay on this computer. Mask them before you screenshot or record.
## 3. Install CLI
The app **does not silently install** any CLI. In **CLI configuration**, click **Install** / **Update** (it shows a plan first, then runs after you confirm), or install in a system terminal and come back to Settings to detect again.
Install commands live on each engine page so this page does not copy them:
| Engine | Install notes |
| ---------------- | ------------------------------------------------------------------ |
| Claude Code | [Install](/en/desktop/providers/claude#install) |
| Codex | [Install](/en/desktop/providers/codex#install) |
| Kimi | [Install](/en/desktop/providers/kimi#install) |
| Grok | [Install](/en/desktop/providers/grok#install) (use WSL on Windows) |
| OpenCode | [Install](/en/desktop/providers/opencode#install) |
| Pi | [Install](/en/desktop/providers/pi#install) |
| DeepSeek Harness | [Install](/en/desktop/providers/dsh#install) |
Failed detects, PATH, and custom paths: [Detect and install](/en/desktop/providers/cli).
## 4. Config paths
| Path | Use |
| ----------------------------------- | ---------------------- |
| `~/.ccgui` | CCGUI config |
| `~/.claude/settings.json` | Claude Code CLI config |
| `~/.codex/config.toml`, `auth.json` | Codex CLI config |
| `~/.kimi-code/config.toml` | Kimi CLI config |
| `~/.grok/config.toml` | Grok CLI config |
| `~/.config/opencode/opencode.json` | OpenCode CLI config |
| `~/.pi/agent/auth.json` | Pi CLI config |
## 5. Add a project workspace
The app organizes sessions and files as a workspace / project:
1. Open Home
2. Click **Add project**
3. Choose a local folder
4. Confirm to enter that workspace
 Without a workspace, file references, the Git panel, and project memory have no root.
## 6. Auto-update
The app has a built-in updater. It reads `latest.json` from GitHub Releases. When a new version is available, follow the prompt to install.
Next: [Send the first message](/en/desktop/start/first-task).
Without a workspace, file references, the Git panel, and project memory have no root.
## 6. Auto-update
The app has a built-in updater. It reads `latest.json` from GitHub Releases. When a new version is available, follow the prompt to install.
Next: [Send the first message](/en/desktop/start/first-task).